> ## Documentation Index
> Fetch the complete documentation index at: https://docs.onyx.app/llms.txt
> Use this file to discover all available pages before exploring further.
# OIDC
> OpenID Connect authentication setup
Configure Onyx with OpenID Connect (OIDC) authentication.
Available with common identity providers such as Okta and Microsoft Entra ID (Azure AD).
This guide will walk you through the setup process for Okta. Other identity providers will have a similar process.
Please contact us if you need help with a different identity provider.
## Guide
Navigate to the Okta **Admin Console** → **Applications** → **Create App Integration**.
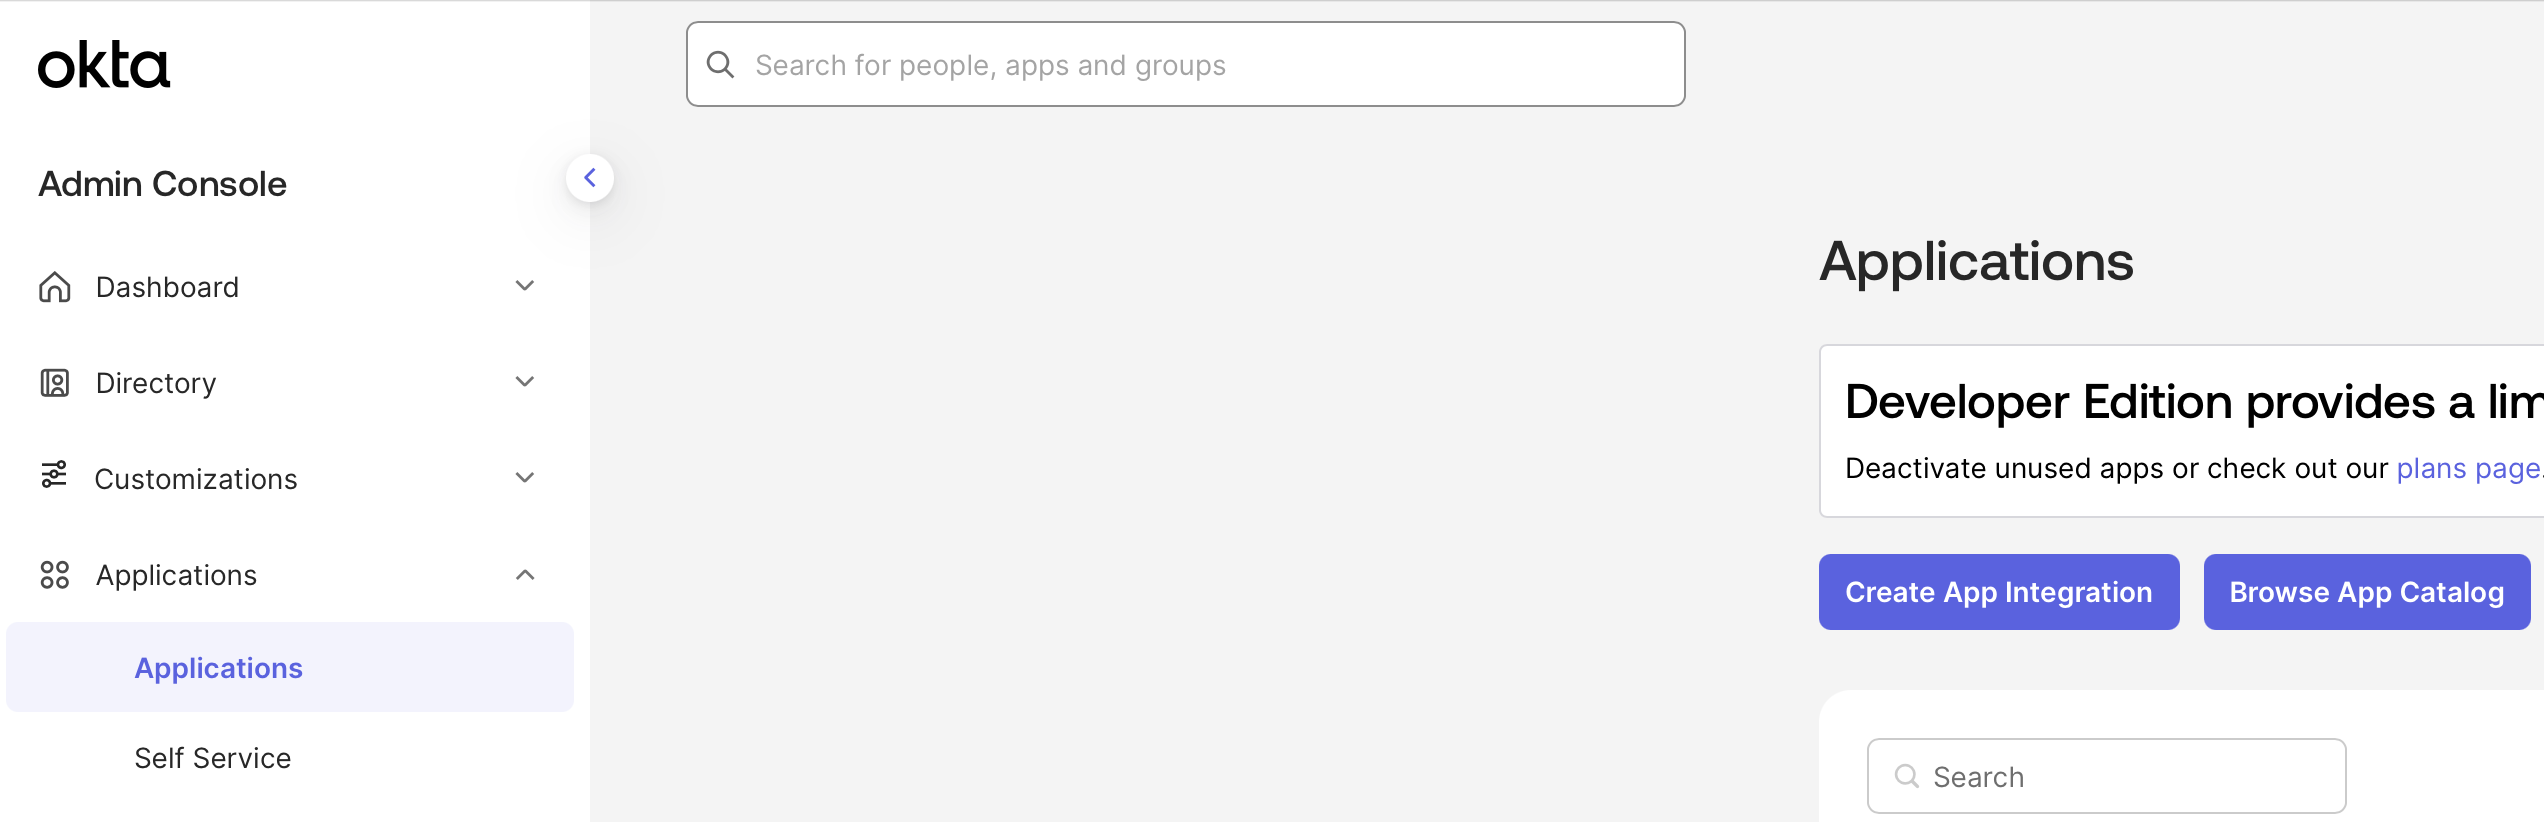 Select **OIDC** and **Web Application**.
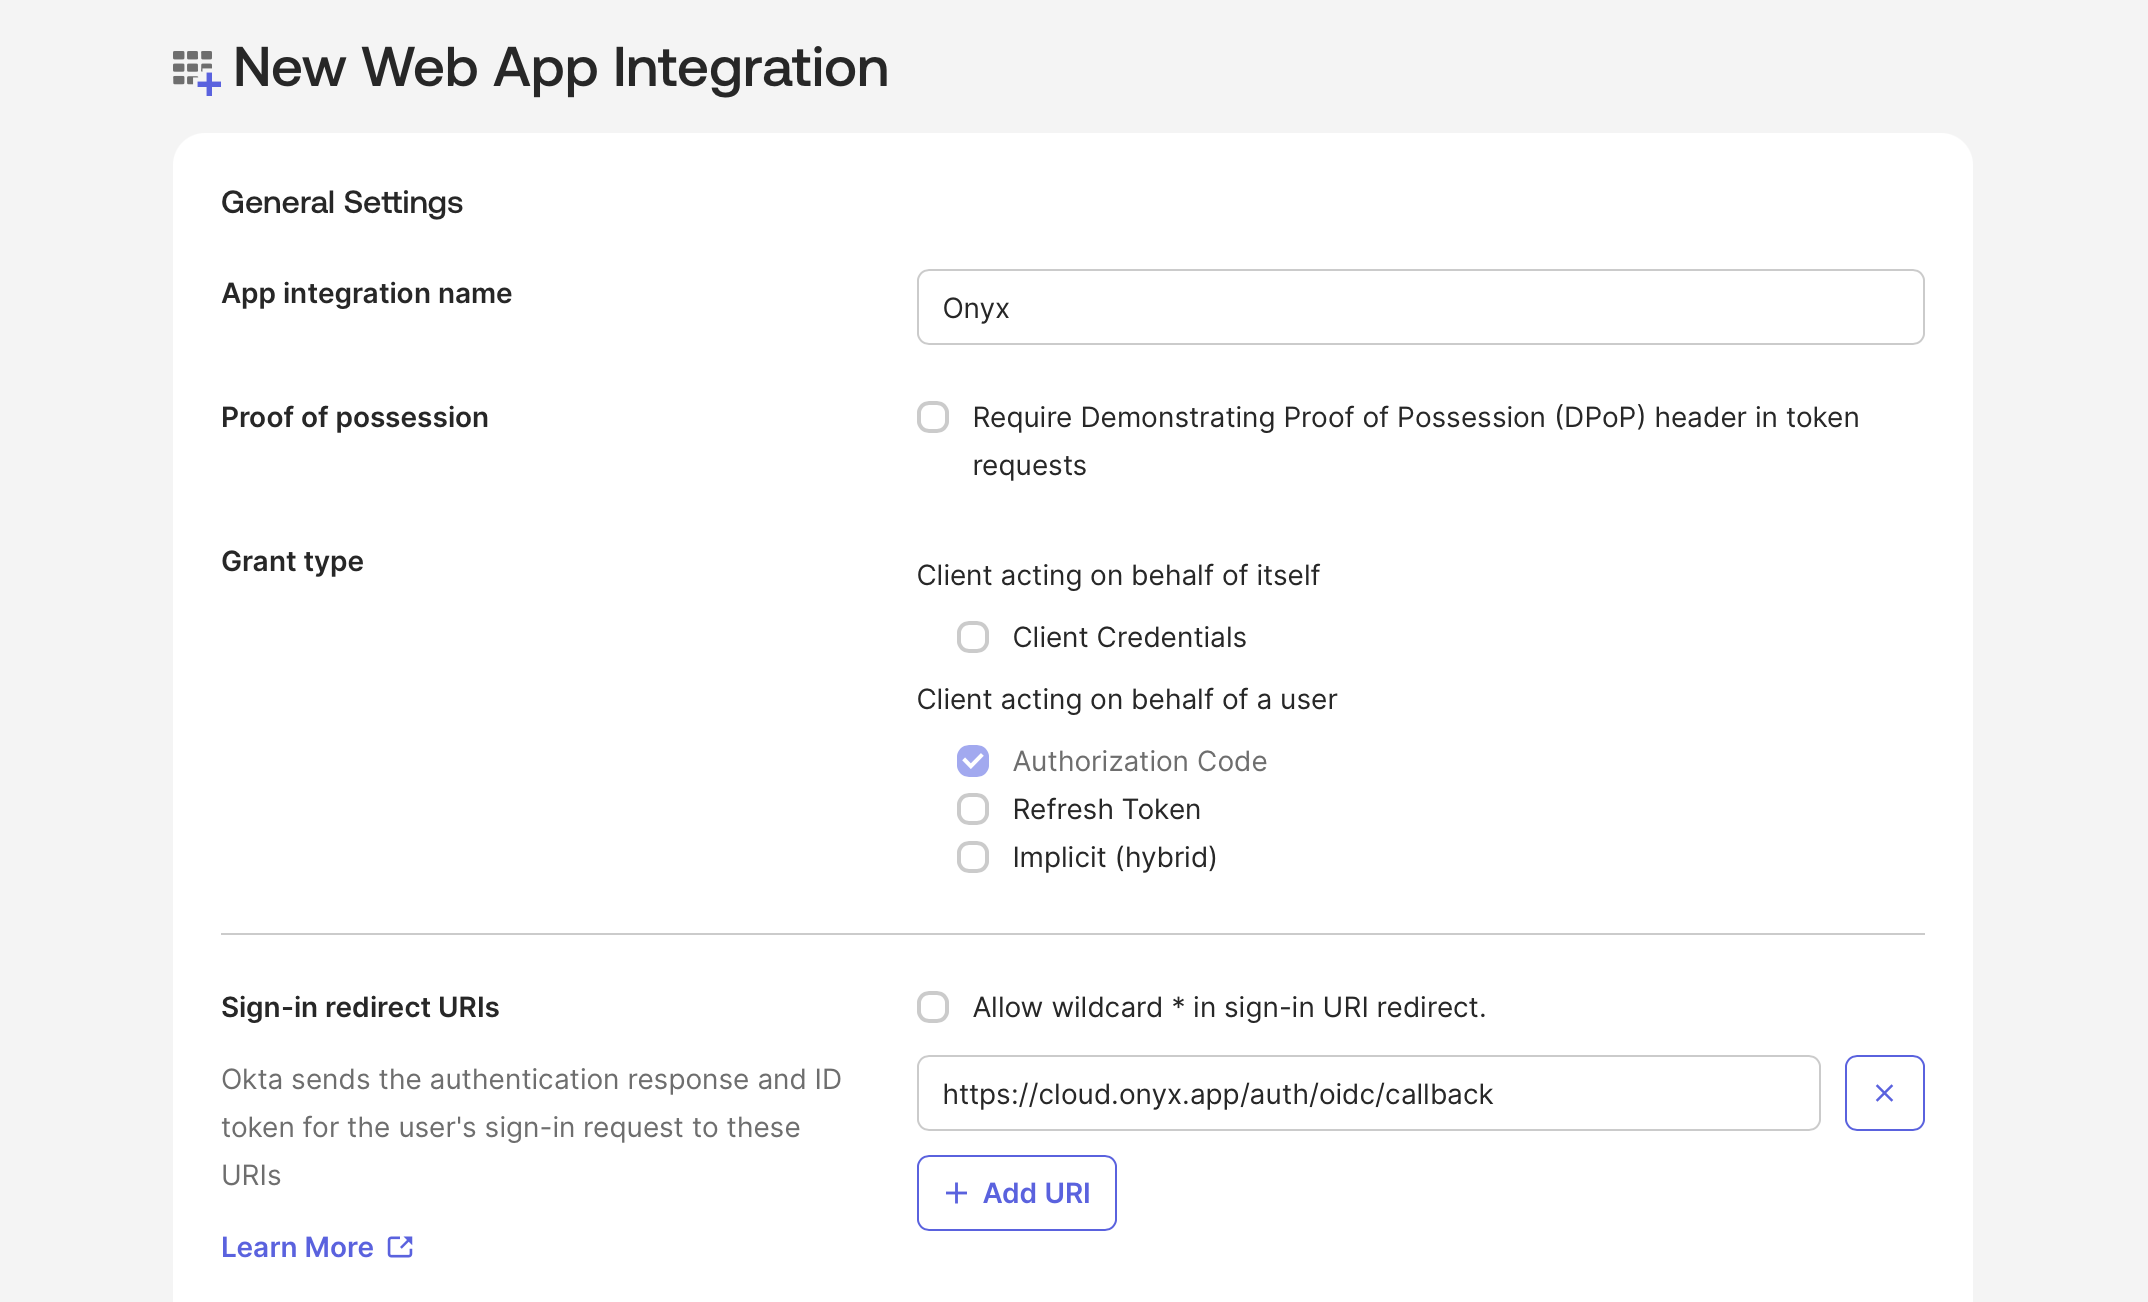
Name your application `Onyx`.
If you are white-labeling Onyx, you can freely name your application.
Add a **Sign-in redirect URI**
```
https://YOUR_ONYX_DOMAIN.com/auth/oidc/callback
```
Determine whether all users or select groups may access Onyx or skip this step and assign users later.
Select **OIDC** and **Web Application**.
Name your application `Onyx`.
If you are white-labeling Onyx, you can freely name your application.
Add a **Sign-in redirect URI**
```
https://YOUR_ONYX_DOMAIN.com/auth/oidc/callback
```
Determine whether all users or select groups may access Onyx or skip this step and assign users later.
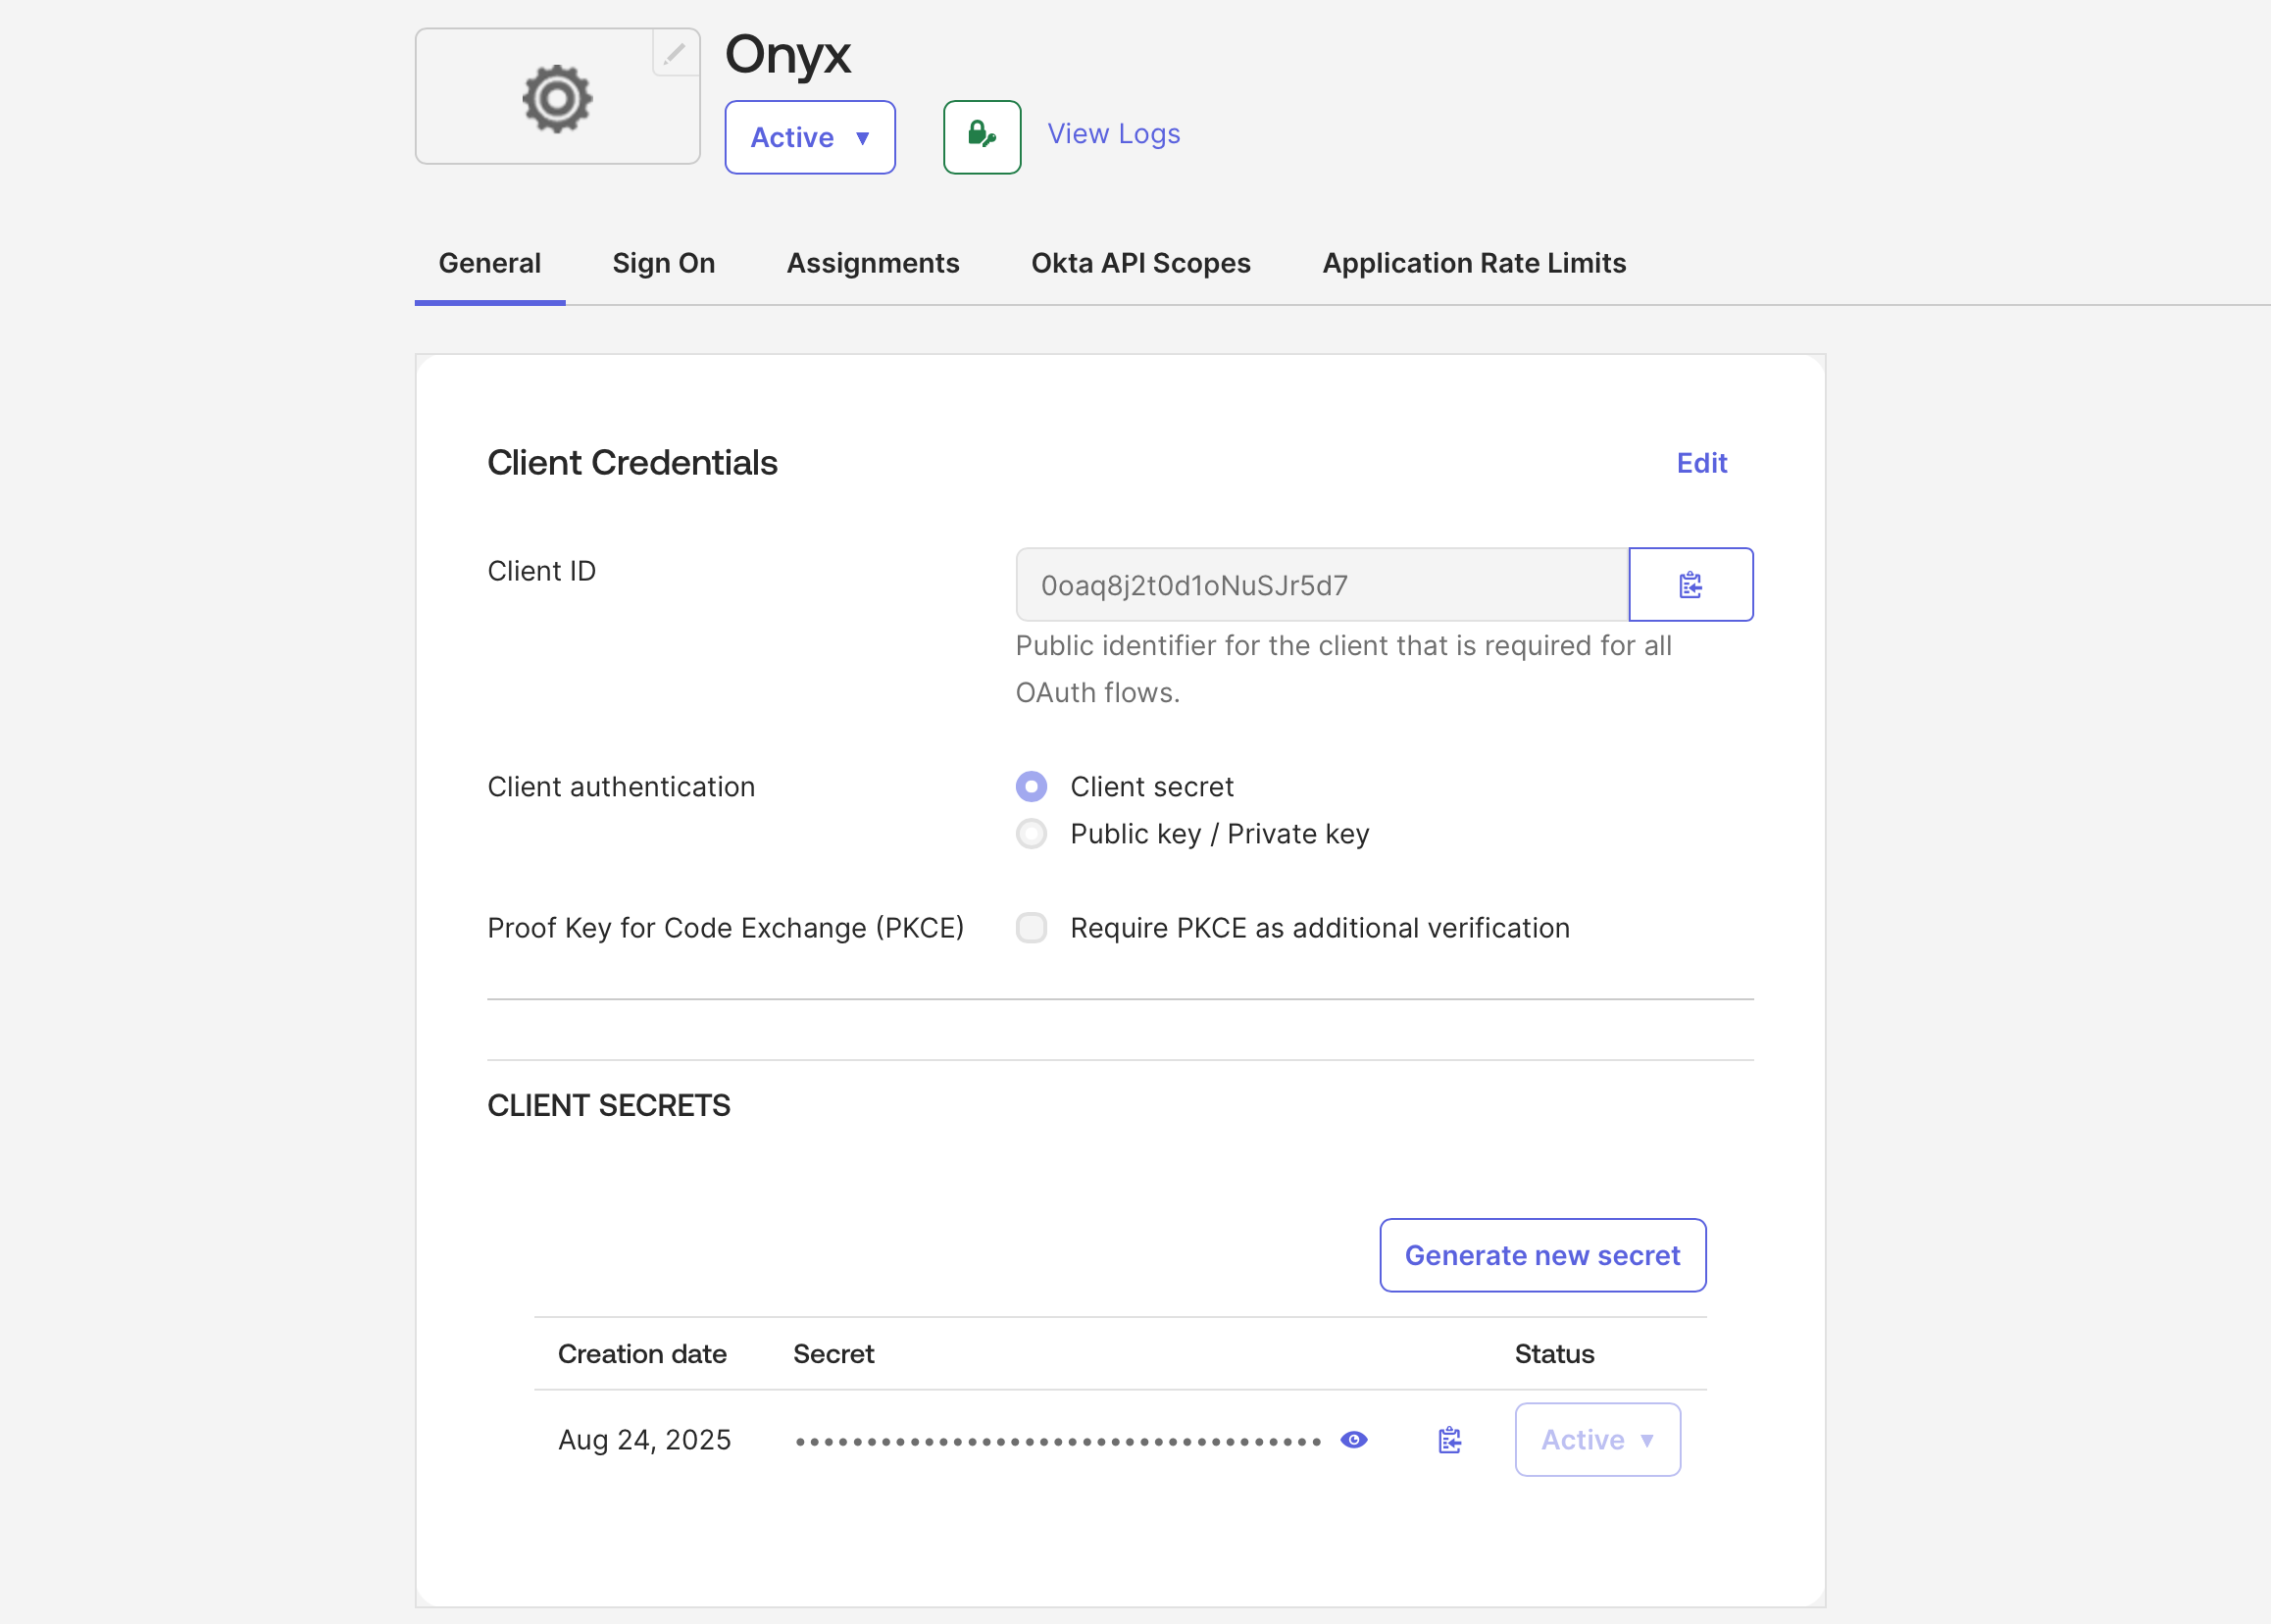
 Create the new Application and save the **Client ID** and **Client Secret**.
Also note your **Okta Base URL** in the format of `https://.okta.com`.
Create the new Application and save the **Client ID** and **Client Secret**.
Also note your **Okta Base URL** in the format of `https://.okta.com`.
 After saving your application,
you can upload the Onyx logo or your white-labeled logo by clicking the gear icon next to the app title **Onyx**
Configure Onyx with the following environment variables in your `.env` or `values.yaml` file (Docker and Kubernetes,
respectively).
```bash .env theme={null}
AUTH_TYPE=oidc
OAUTH_CLIENT_ID=
OAUTH_CLIENT_SECRET=
OPENID_CONFIG_URL=https:///.well-known/openid-configuration
```
If you're using Docker but don't have a `.env` file,
copy `onyx/deployment/docker_compose/env.prod.template` to a new `.env` file in the same directory.
```bash values.yaml theme={null}
auth:
secrets:
OAUTH_CLIENT_ID:
OAUTH_CLIENT_SECRET:
configMap:
AUTH_TYPE: oidc
OPENID_CONFIG_URL: https:///.well-known/openid-configuration
```
## Customizing requested scopes
By default, Onyx uses the standard OIDC base scopes when redirecting users to the identity provider.
You can override this list with `OIDC_SCOPE_OVERRIDE`, a comma-separated list of scopes to request instead.
This is primarily useful when the access token issued at login should be passed through to tool calls that need
additional scopes from the identity provider.
```bash .env theme={null}
OIDC_SCOPE_OVERRIDE=openid,email,profile,groups
```
Onyx will always also request `offline_access` so refresh tokens are issued, even if it is not in the override list.
The override **replaces** the default scopes — make sure `openid`, `email`,
and `profile` are still included if you want standard login to keep working.
Any scopes you add here must also be enabled on the application in your identity provider.
Onyx only changes what is sent in the authorize request;
the IdP still rejects scopes that are not configured for the client.
## Enabling PKCE
PKCE is disabled by default to preserve backwards compatibility with existing OIDC deployments. To enable it, set:
```bash .env theme={null}
OIDC_PKCE_ENABLED=true
```
After saving your application,
you can upload the Onyx logo or your white-labeled logo by clicking the gear icon next to the app title **Onyx**
Configure Onyx with the following environment variables in your `.env` or `values.yaml` file (Docker and Kubernetes,
respectively).
```bash .env theme={null}
AUTH_TYPE=oidc
OAUTH_CLIENT_ID=
OAUTH_CLIENT_SECRET=
OPENID_CONFIG_URL=https:///.well-known/openid-configuration
```
If you're using Docker but don't have a `.env` file,
copy `onyx/deployment/docker_compose/env.prod.template` to a new `.env` file in the same directory.
```bash values.yaml theme={null}
auth:
secrets:
OAUTH_CLIENT_ID:
OAUTH_CLIENT_SECRET:
configMap:
AUTH_TYPE: oidc
OPENID_CONFIG_URL: https:///.well-known/openid-configuration
```
## Customizing requested scopes
By default, Onyx uses the standard OIDC base scopes when redirecting users to the identity provider.
You can override this list with `OIDC_SCOPE_OVERRIDE`, a comma-separated list of scopes to request instead.
This is primarily useful when the access token issued at login should be passed through to tool calls that need
additional scopes from the identity provider.
```bash .env theme={null}
OIDC_SCOPE_OVERRIDE=openid,email,profile,groups
```
Onyx will always also request `offline_access` so refresh tokens are issued, even if it is not in the override list.
The override **replaces** the default scopes — make sure `openid`, `email`,
and `profile` are still included if you want standard login to keep working.
Any scopes you add here must also be enabled on the application in your identity provider.
Onyx only changes what is sent in the authorize request;
the IdP still rejects scopes that are not configured for the client.
## Enabling PKCE
PKCE is disabled by default to preserve backwards compatibility with existing OIDC deployments. To enable it, set:
```bash .env theme={null}
OIDC_PKCE_ENABLED=true
```