> ## Documentation Index
> Fetch the complete documentation index at: https://docs.onyx.app/llms.txt
> Use this file to discover all available pages before exploring further.
# Azure
> Deploy Onyx on Azure Virtual Machines
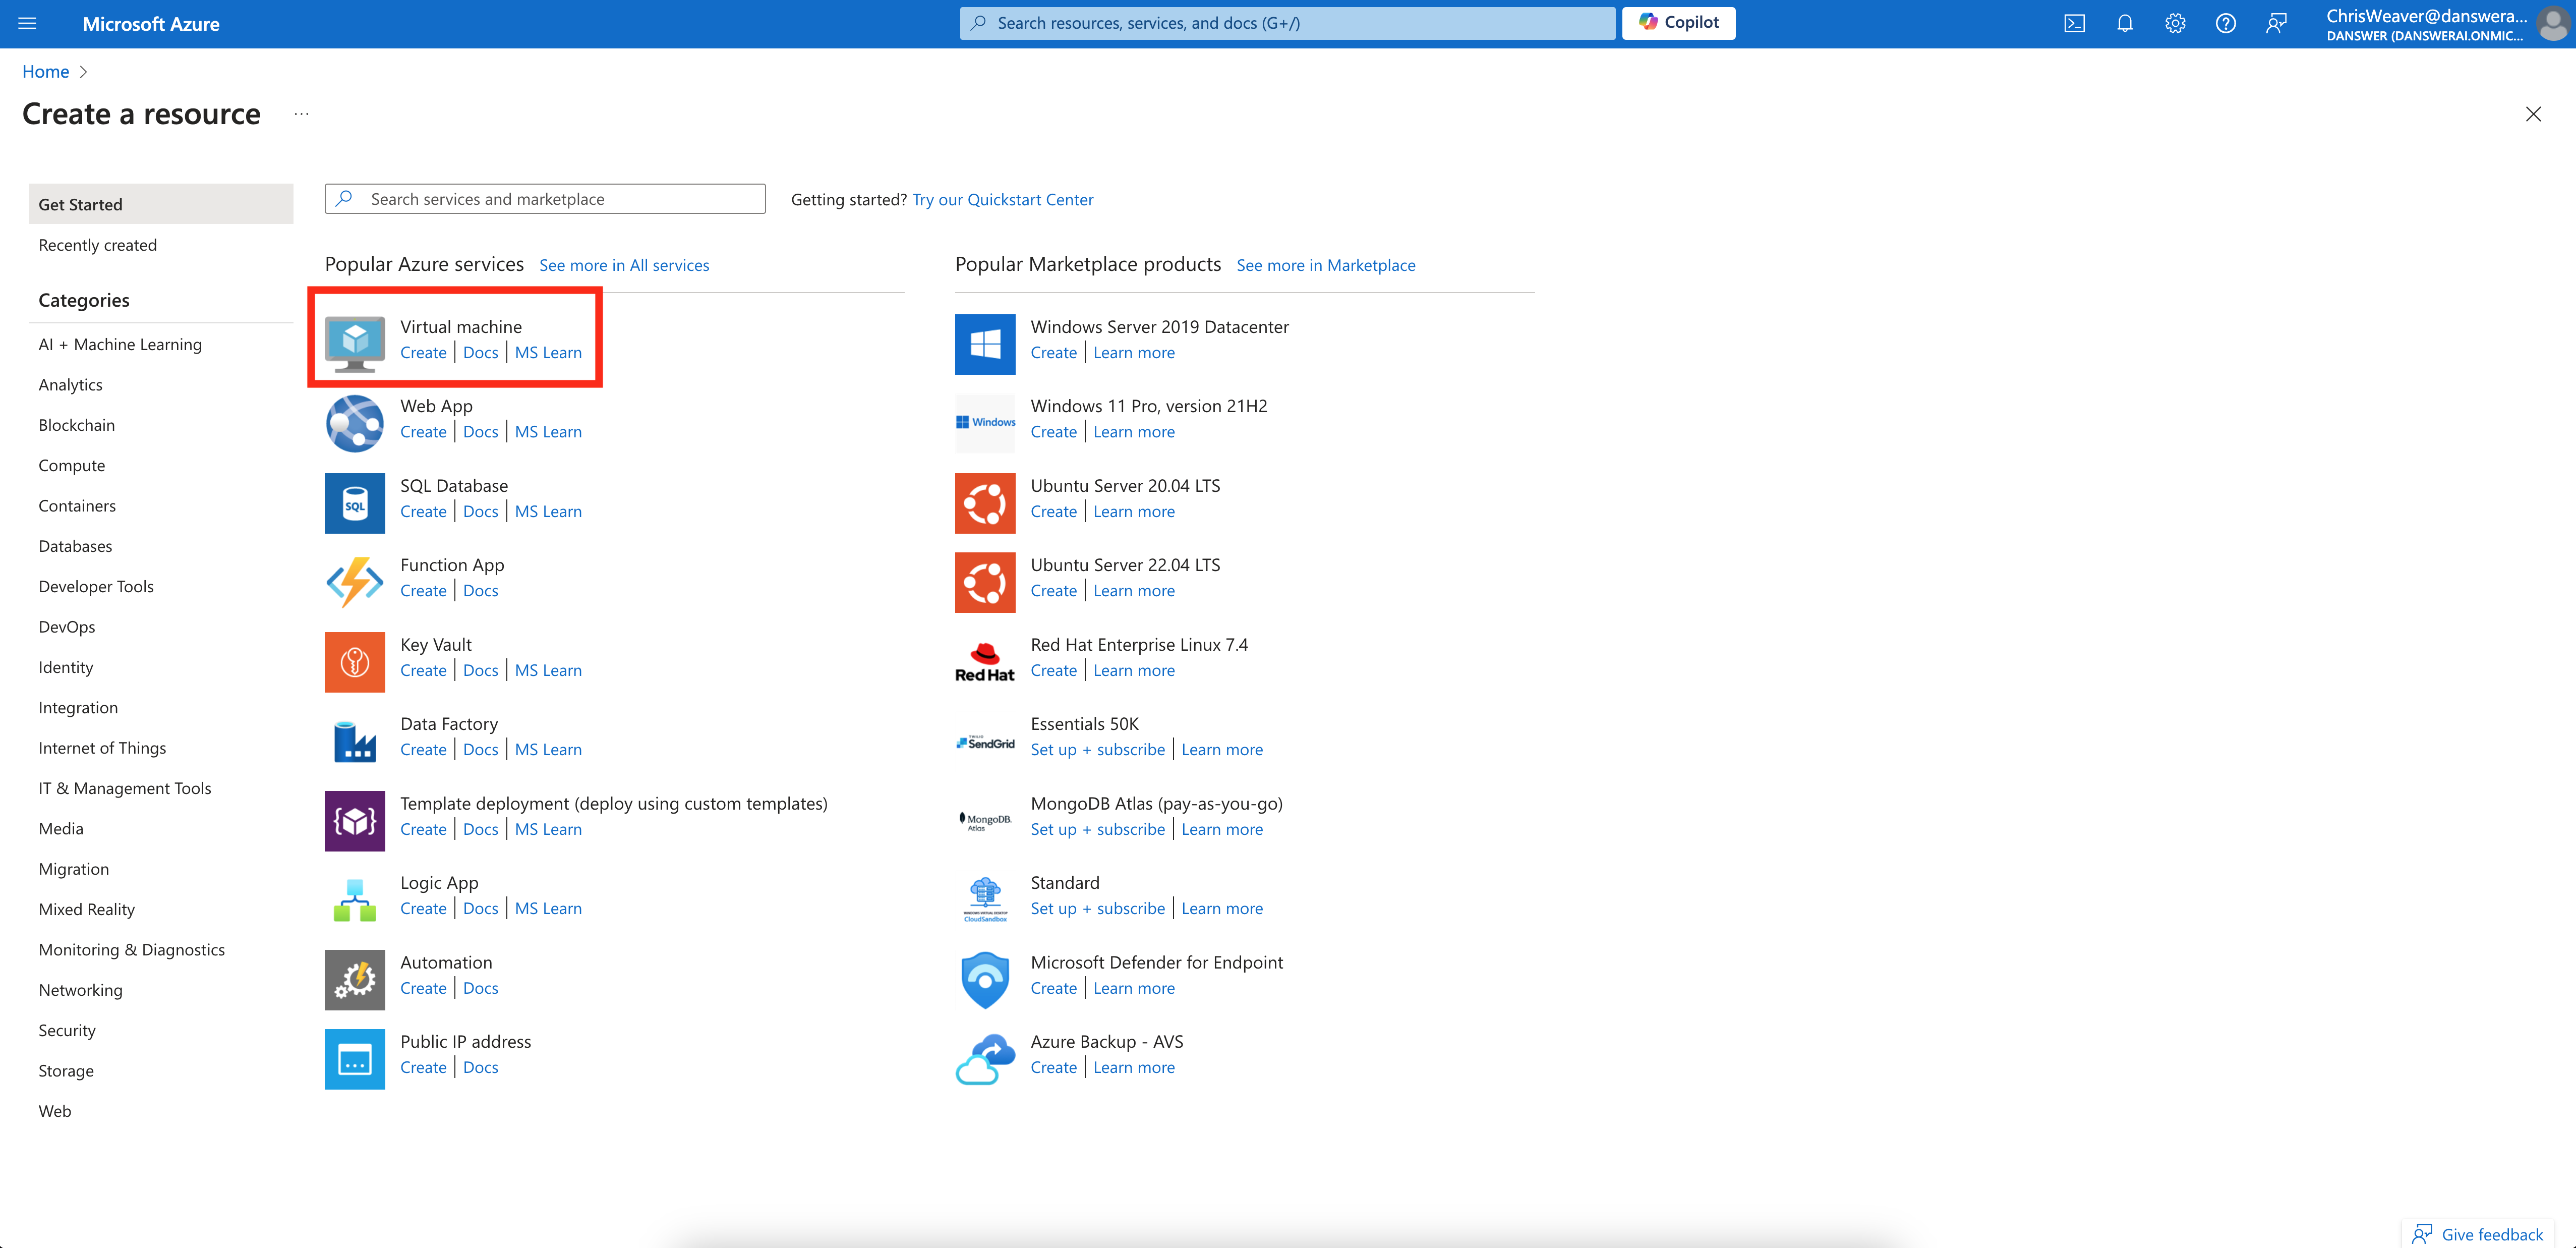
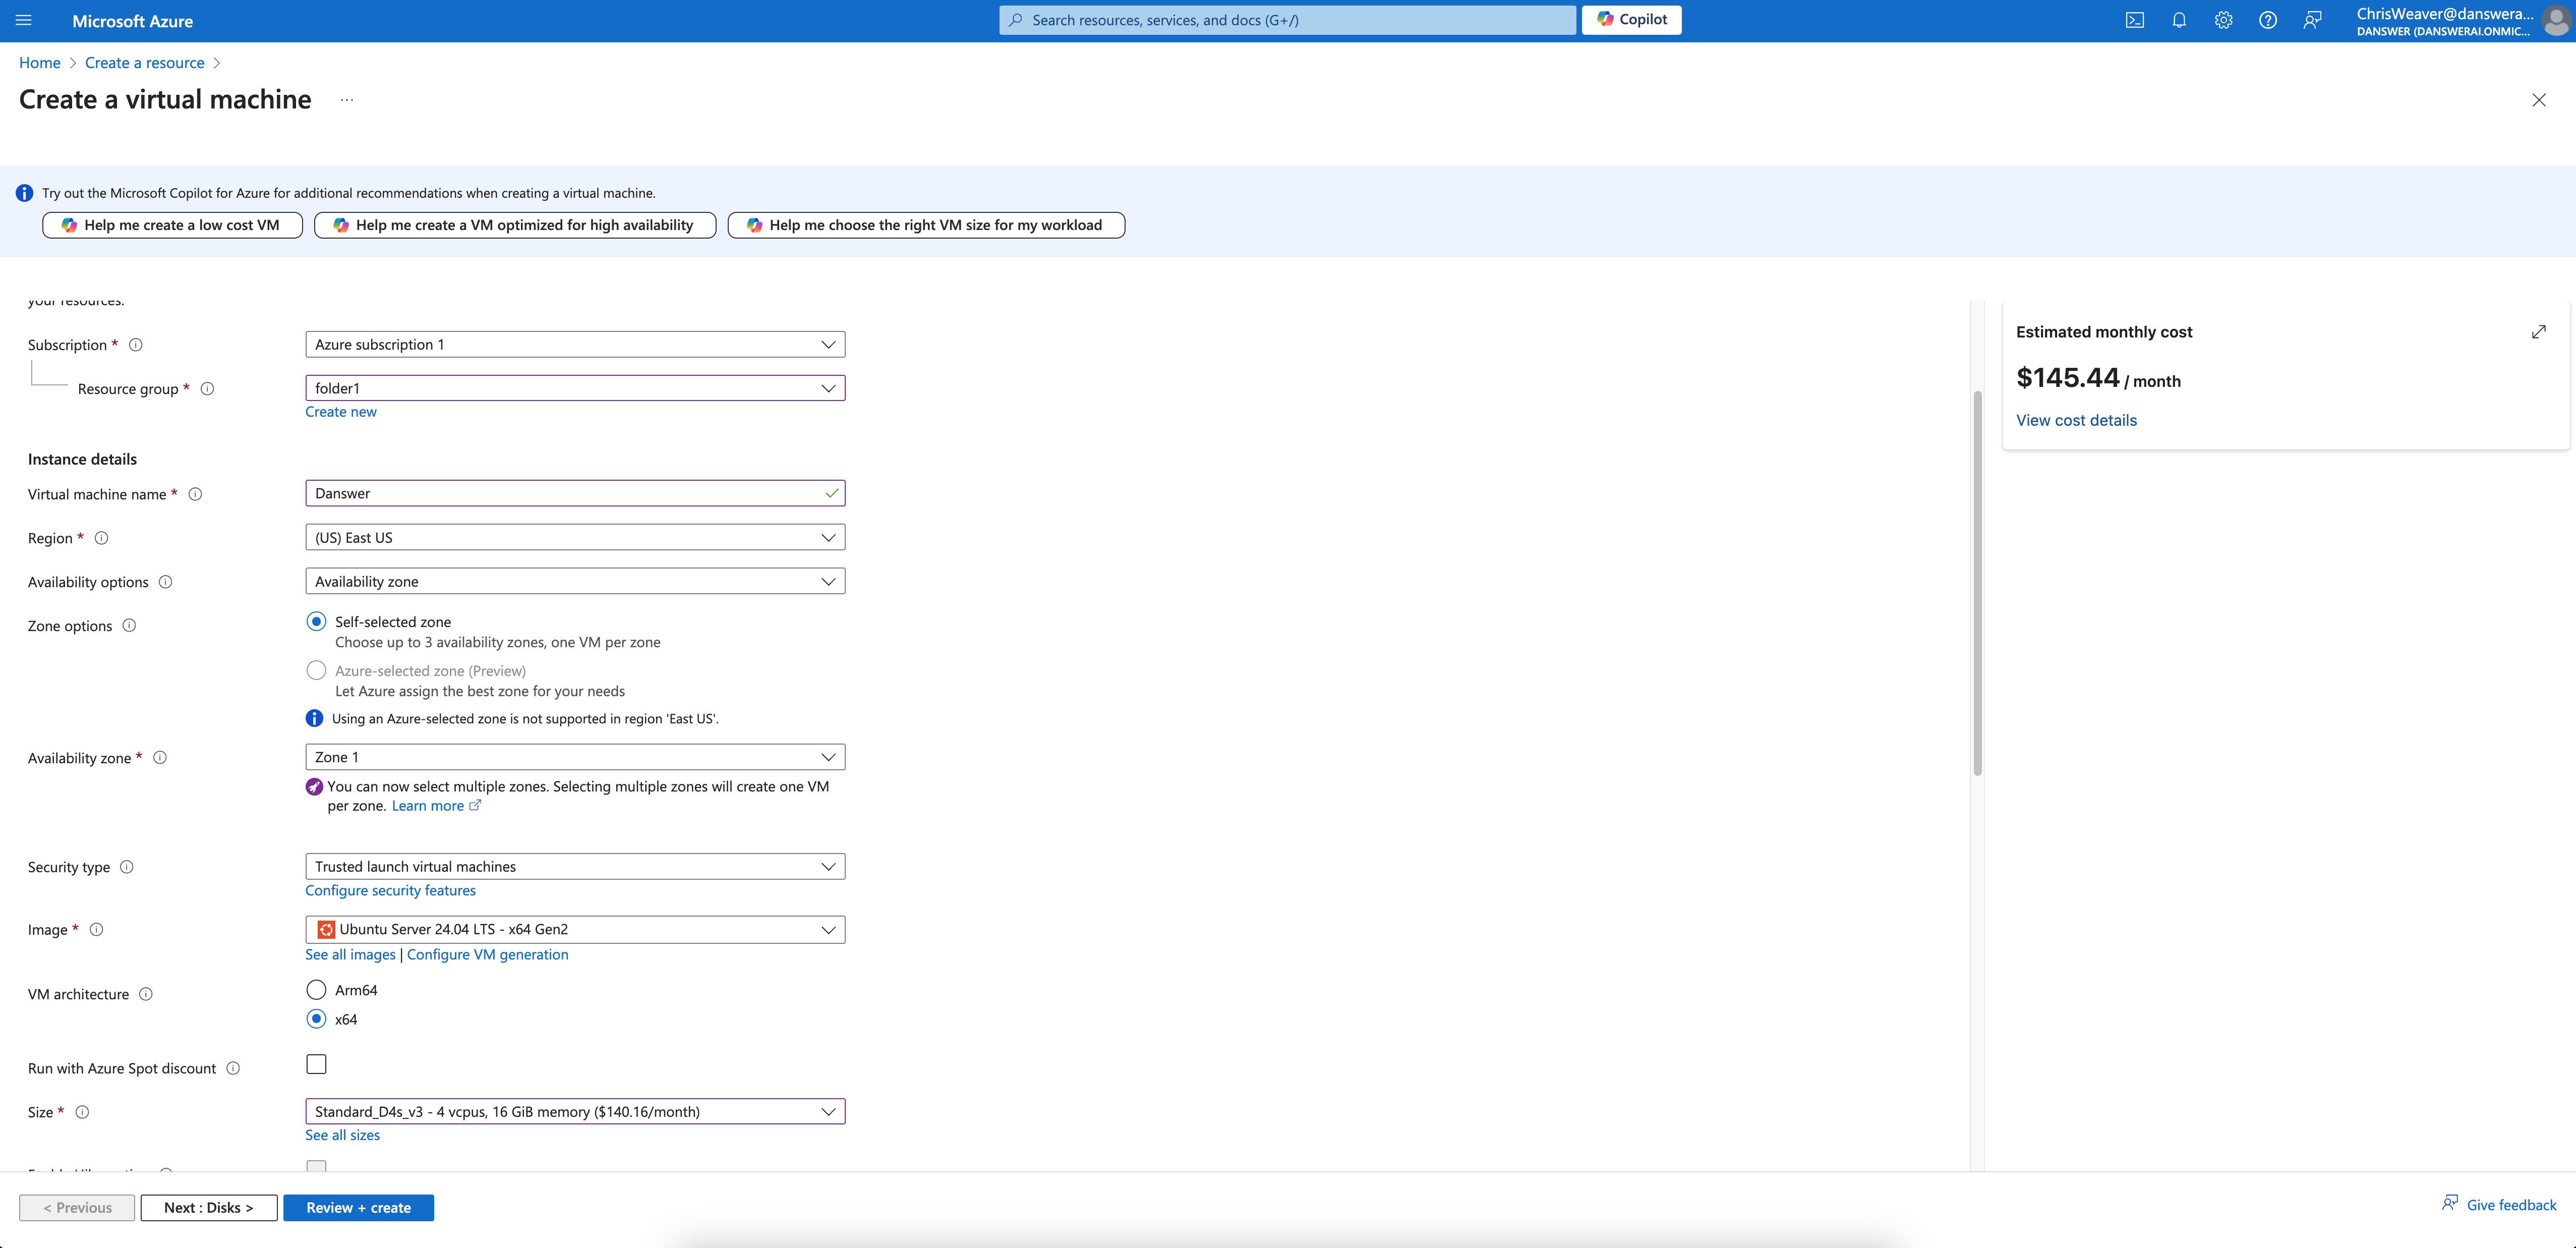
Create a VM instance with the appropriate resources. For this guide,
we will use the recommended `Standard_D4s_v3` instance.
Read our [Resourcing guide](/deployment/getting_started/resourcing) for more details.
* Give your instance a descriptive name like `onyx-prod`
* Select the `Ubuntu Server 20.04 LTS` image
* Select the `Standard_D4s_v3` size
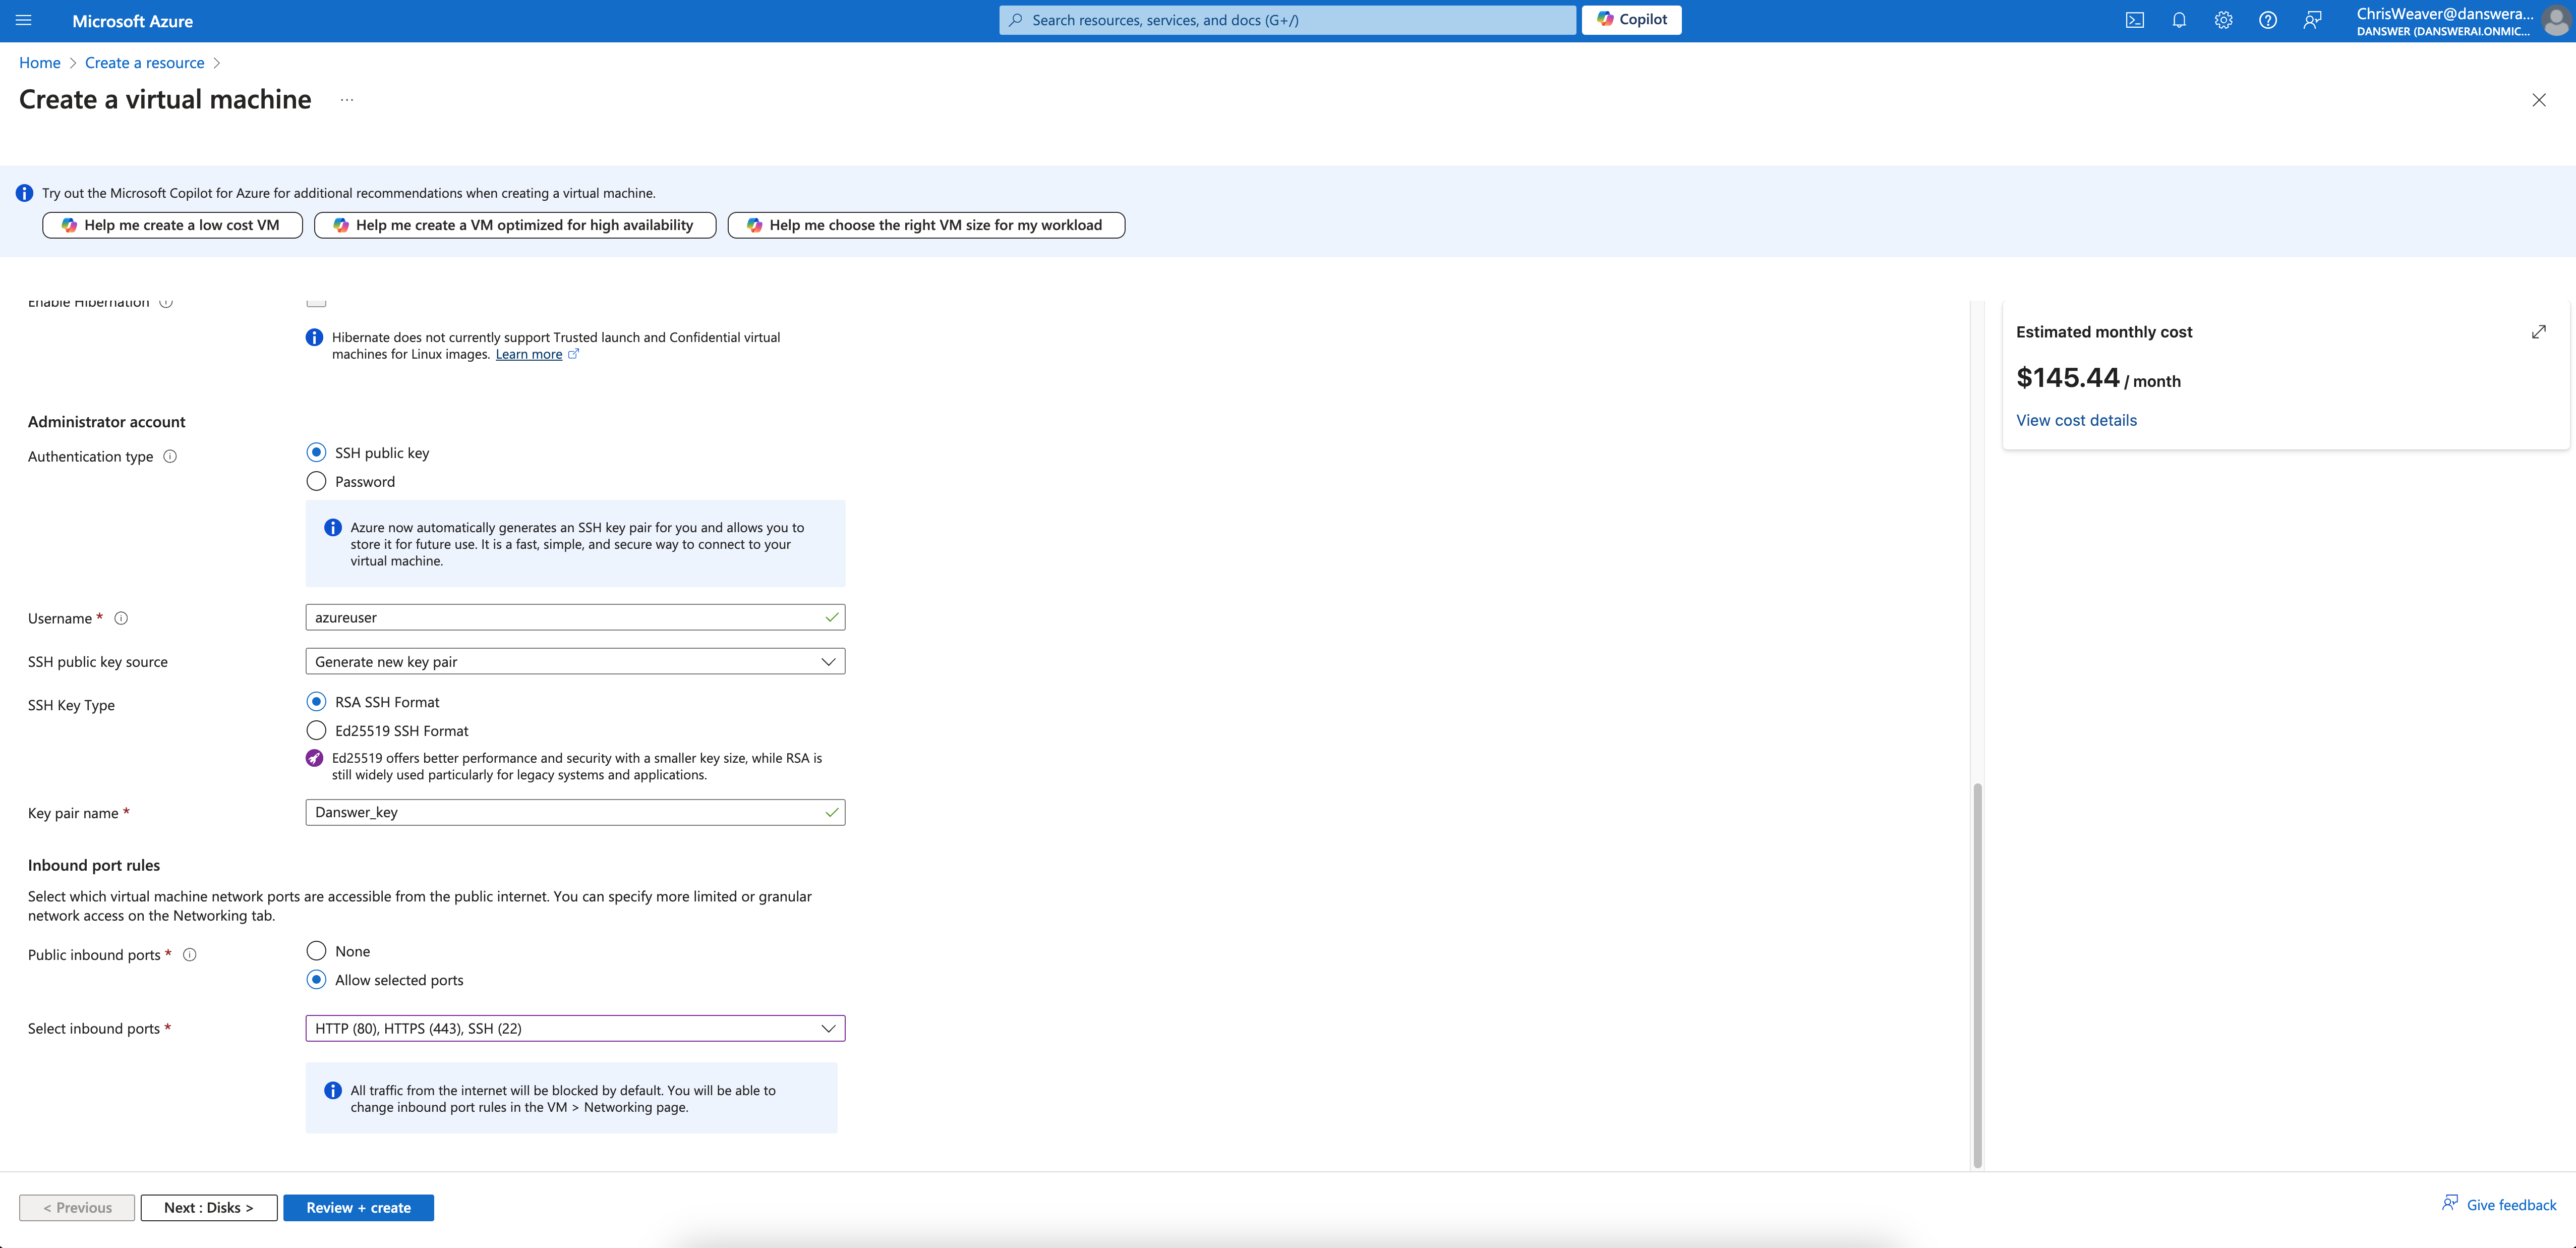
* Select `Allow selected ports` and check `HTTPS (443)` in the *Inbound port rules* section
* Configure storage following the Resourcing Guide
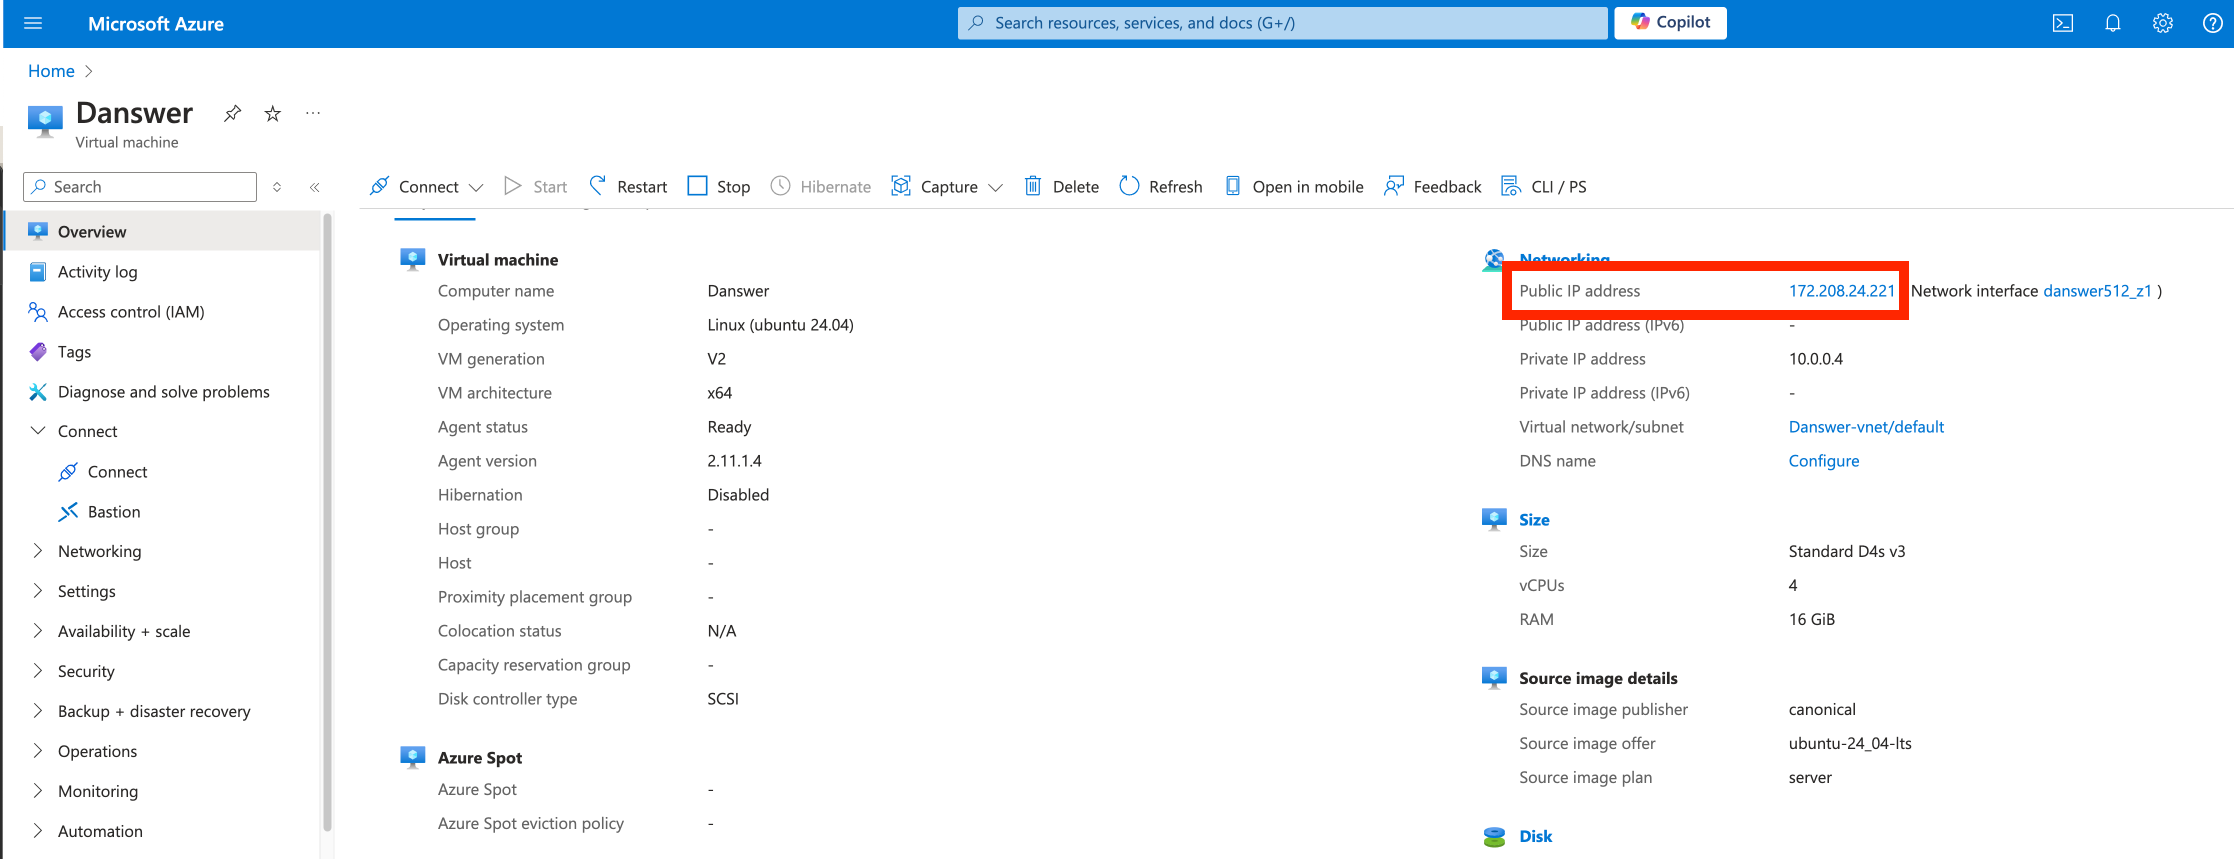
 Click **Create** and then view your instance details.
Save the **Public IP address** of the instance!
Click **Create** and then view your instance details.
Save the **Public IP address** of the instance!
 If you don't have a domain, buy one from a DNS provider like [GoDaddy](https://www.godaddy.com/)
or just skip HTTPS for now.
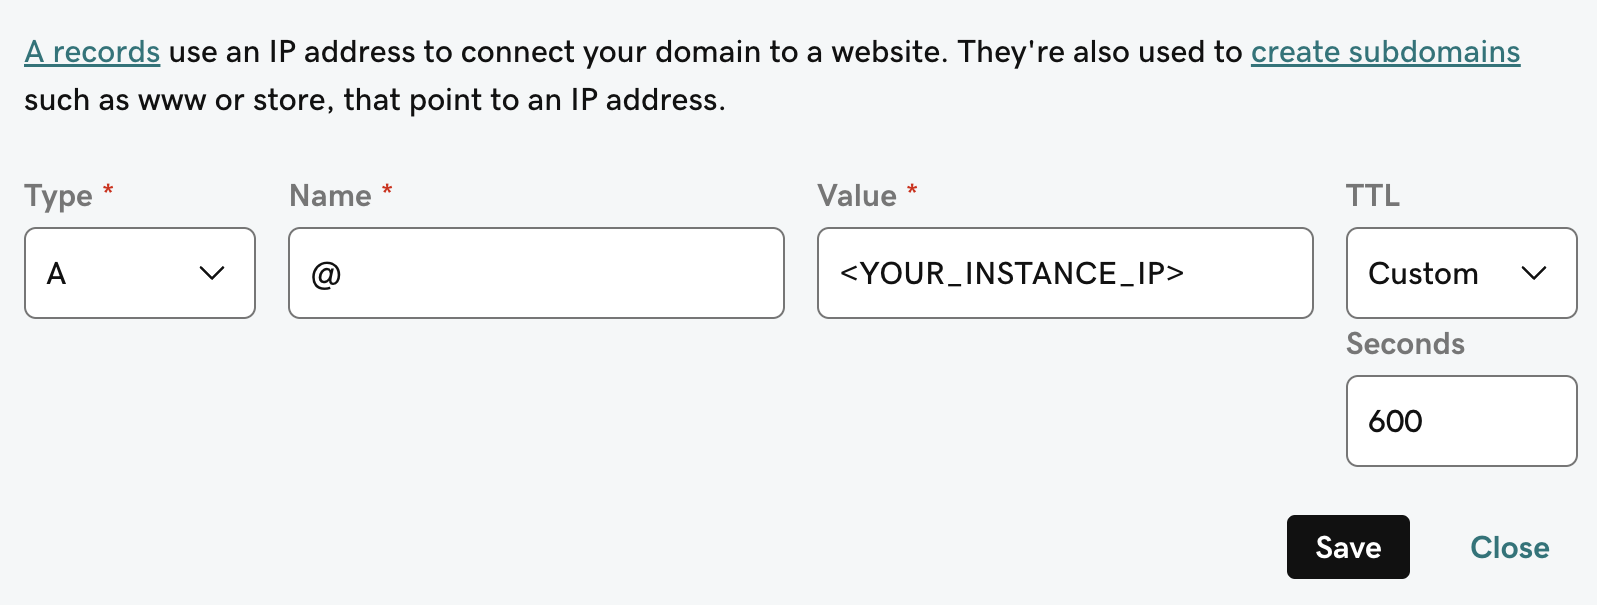
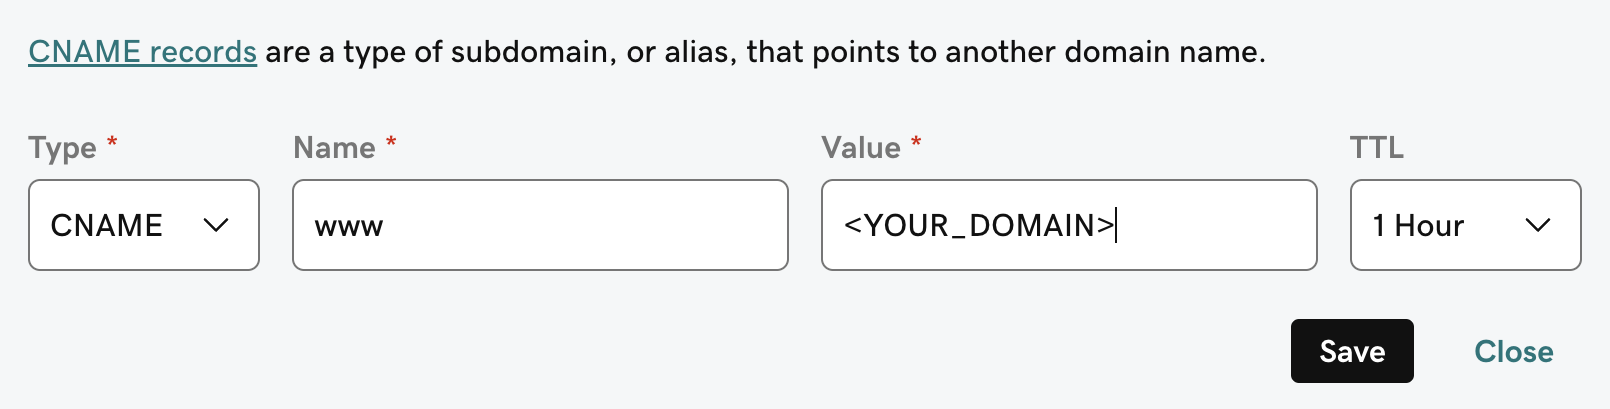
To point our domain to the new instance, we need to add an `A` and `CNAME` record to our DNS provider.
The `A` record should be the subdomain that you would like to use for the Onyx instance like `prod`.
The `CNAME` record should be the same name with the `www.` in front resulting in `www.prod` pointing to the full
domain like `prod.onyx.app`.
If you don't have a domain, buy one from a DNS provider like [GoDaddy](https://www.godaddy.com/)
or just skip HTTPS for now.
To point our domain to the new instance, we need to add an `A` and `CNAME` record to our DNS provider.
The `A` record should be the subdomain that you would like to use for the Onyx instance like `prod`.
The `CNAME` record should be the same name with the `www.` in front resulting in `www.prod` pointing to the full
domain like `prod.onyx.app`.
 Onyx requires `git`, `docker`, and `docker compose`.
To install these on Ubuntu Server 20.04 LTS, run the following:
```bash theme={null}
sudo apt-get update
sudo apt-get install -y ca-certificates curl
sudo install -m 0755 -d /etc/apt/keyrings
sudo curl -fsSL https://download.docker.com/linux/ubuntu/gpg -o /etc/apt/keyrings/docker.asc
sudo chmod a+r /etc/apt/keyrings/docker.asc
echo \
"deb [arch=$(dpkg --print-architecture) signed-by=/etc/apt/keyrings/docker.asc] https://download.docker.com/linux/ubuntu \
$(. /etc/os-release && echo "$VERSION_CODENAME") stable" | \
sudo tee /etc/apt/sources.list.d/docker.list > /dev/null
sudo apt-get update
sudo apt-get install -y docker-ce docker-ce-cli containerd.io docker-buildx-plugin docker-compose-plugin git
```
To install Onyx, we'll need to clone the repo and set the necessary environment variables.
```bash theme={null}
git clone --depth 1 https://github.com/onyx-dot-app/onyx.git
cd onyx/deployment/docker_compose
cp env.prod.template .env
cp env.nginx.template .env.nginx
```
Fill out the `.env` and `.env.nginx` files.
```bash .env expandable theme={null}
WEB_DOMAIN= # Something like "onyx.app"
# If your email is something like "chris@onyx.app", then this should be "onyx.app"
# This prevents people outside your company from creating an account
VALID_EMAIL_DOMAINS=
```
Email/password login works out of the box, and SSO (Google / OIDC / SAML) is configured later from the admin panel.
See our [auth guides](/deployment/authentication/basic) for details.
```bash .env.nginx theme={null}
DOMAIN= # Something like "onyx.app"
```
Running the `init-letsencrypt.sh` script will get us a SSL certificate from letsencrypt and launch the Onyx stack.
```bash theme={null}
./init-letsencrypt.sh
```
You will hit an error if you fail the letsencrypt workflow more than 5 times.
You will need to wait 72 hours or request a new domain.
If you are skipping the HTTPS setup, start Onyx manually:
```bash theme={null}
docker compose -f docker-compose.dev.yml -p onyx-stack up -d --build --force-recreate
```
Give Onyx a few minutes to start up.
You can monitor the progress with `docker logs onyx-stack-api_server-1 -f`.
You can access Onyx from the instance Public IPv4 or from the domain you set up earlier!
## Next Steps
Set up authentication for your Onyx deployment with OAuth, OIDC, or SAML.
Learn about all available configuration options for your Onyx deployment.
Onyx requires `git`, `docker`, and `docker compose`.
To install these on Ubuntu Server 20.04 LTS, run the following:
```bash theme={null}
sudo apt-get update
sudo apt-get install -y ca-certificates curl
sudo install -m 0755 -d /etc/apt/keyrings
sudo curl -fsSL https://download.docker.com/linux/ubuntu/gpg -o /etc/apt/keyrings/docker.asc
sudo chmod a+r /etc/apt/keyrings/docker.asc
echo \
"deb [arch=$(dpkg --print-architecture) signed-by=/etc/apt/keyrings/docker.asc] https://download.docker.com/linux/ubuntu \
$(. /etc/os-release && echo "$VERSION_CODENAME") stable" | \
sudo tee /etc/apt/sources.list.d/docker.list > /dev/null
sudo apt-get update
sudo apt-get install -y docker-ce docker-ce-cli containerd.io docker-buildx-plugin docker-compose-plugin git
```
To install Onyx, we'll need to clone the repo and set the necessary environment variables.
```bash theme={null}
git clone --depth 1 https://github.com/onyx-dot-app/onyx.git
cd onyx/deployment/docker_compose
cp env.prod.template .env
cp env.nginx.template .env.nginx
```
Fill out the `.env` and `.env.nginx` files.
```bash .env expandable theme={null}
WEB_DOMAIN= # Something like "onyx.app"
# If your email is something like "chris@onyx.app", then this should be "onyx.app"
# This prevents people outside your company from creating an account
VALID_EMAIL_DOMAINS=
```
Email/password login works out of the box, and SSO (Google / OIDC / SAML) is configured later from the admin panel.
See our [auth guides](/deployment/authentication/basic) for details.
```bash .env.nginx theme={null}
DOMAIN= # Something like "onyx.app"
```
Running the `init-letsencrypt.sh` script will get us a SSL certificate from letsencrypt and launch the Onyx stack.
```bash theme={null}
./init-letsencrypt.sh
```
You will hit an error if you fail the letsencrypt workflow more than 5 times.
You will need to wait 72 hours or request a new domain.
If you are skipping the HTTPS setup, start Onyx manually:
```bash theme={null}
docker compose -f docker-compose.dev.yml -p onyx-stack up -d --build --force-recreate
```
Give Onyx a few minutes to start up.
You can monitor the progress with `docker logs onyx-stack-api_server-1 -f`.
You can access Onyx from the instance Public IPv4 or from the domain you set up earlier!
## Next Steps
Set up authentication for your Onyx deployment with OAuth, OIDC, or SAML.
Learn about all available configuration options for your Onyx deployment.