> ## Documentation Index
> Fetch the complete documentation index at: https://docs.onyx.app/llms.txt
> Use this file to discover all available pages before exploring further.
# Digital Ocean
> Deploy Onyx on Digital Ocean Droplets
Create a Droplet with the appropriate resources. For this guide,
we will use a recommended configuration with Docker pre-installed.
Read our [Resourcing guide](/deployment/getting_started/resourcing) for more details.
* Give your Droplet a descriptive name like `onyx-prod`
* Select a region close to your users
* Select the `Docker` image from the *Marketplace* tab
* Choose a Droplet size with at least 4 vCPUs and 16GB RAM
* Configure storage following the Resourcing Guide
* Add your SSH key for secure access
Click **Create Droplet** and then view your Droplet details.
Save the **Public IP address** of the Droplet!
 If you don't have a domain, buy one from a DNS provider like [GoDaddy](https://www.godaddy.com/)
or just skip HTTPS for now.
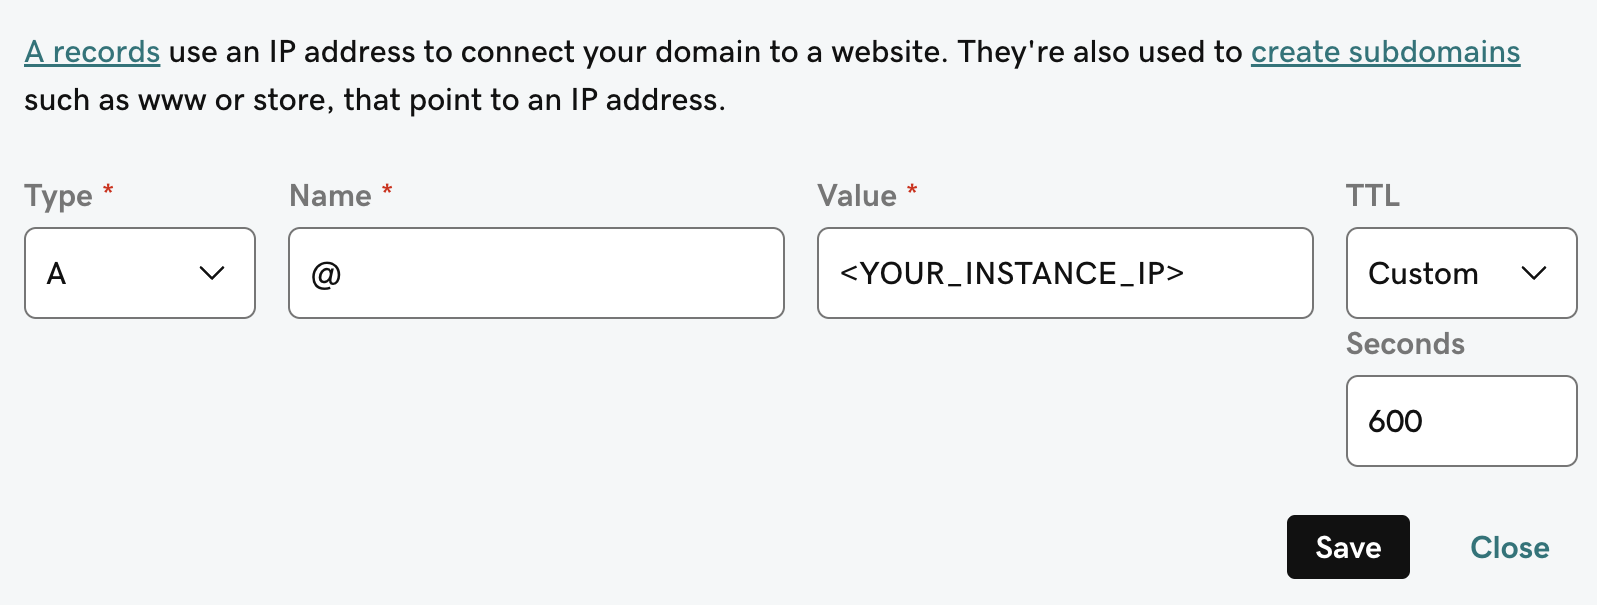
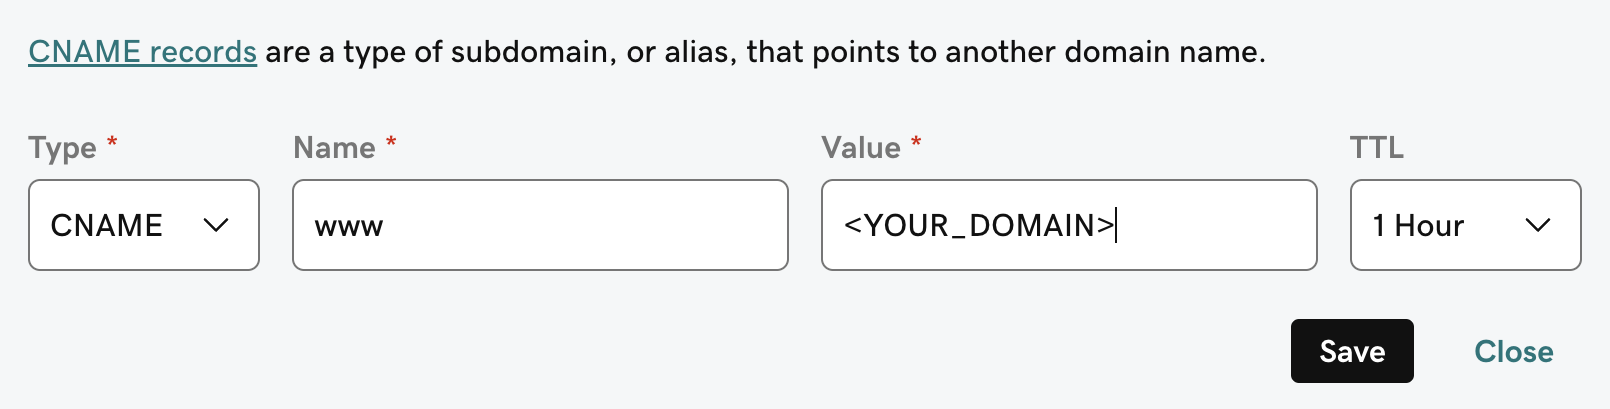
To point our domain to the new instance, we need to add an `A` and `CNAME` record to our DNS provider.
The `A` record should be the subdomain that you would like to use for the Onyx instance like `prod`.
The `CNAME` record should be the same name with the `www.` in front resulting in `www.prod` pointing to the full
domain like `prod.onyx.app`.
If you don't have a domain, buy one from a DNS provider like [GoDaddy](https://www.godaddy.com/)
or just skip HTTPS for now.
To point our domain to the new instance, we need to add an `A` and `CNAME` record to our DNS provider.
The `A` record should be the subdomain that you would like to use for the Onyx instance like `prod`.
The `CNAME` record should be the same name with the `www.` in front resulting in `www.prod` pointing to the full
domain like `prod.onyx.app`.
 Since we selected the Docker Marketplace image, Docker and Docker Compose are already installed.
We just need to install `git`:
```bash theme={null}
sudo apt update
sudo apt install -y git
```
To install Onyx, we'll need to clone the repo and set the necessary environment variables.
```bash theme={null}
git clone --depth 1 https://github.com/onyx-dot-app/onyx.git
cd onyx/deployment/docker_compose
cp env.prod.template .env
cp env.nginx.template .env.nginx
```
Fill out the `.env` and `.env.nginx` files.
```bash .env expandable theme={null}
WEB_DOMAIN= # Something like "onyx.app"
# If your email is something like "chris@onyx.app", then this should be "onyx.app"
# This prevents people outside your company from creating an account
VALID_EMAIL_DOMAINS=
# See our auth guides for options here
AUTH_TYPE=
```
```bash .env.nginx theme={null}
DOMAIN= # Something like "onyx.app"
```
Running the `init-letsencrypt.sh` script will get us a SSL certificate from letsencrypt and launch the Onyx stack.
```bash theme={null}
./init-letsencrypt.sh
```
You will hit an error if you fail the letsencrypt workflow more than 5 times.
You will need to wait 72 hours or request a new domain.
If you are skipping the HTTPS setup, start Onyx manually:
```bash theme={null}
docker compose -f docker-compose.dev.yml -p onyx-stack up -d --build --force-recreate
```
Give Onyx a few minutes to start up.
You can monitor the progress with `docker logs onyx-stack-api_server-1 -f`.
You can access Onyx from the instance Public IPv4 or from the domain you set up earlier!
## Next Steps
Set up authentication for your Onyx deployment with OAuth, OIDC, or SAML.
Learn about all available configuration options for your Onyx deployment.
Since we selected the Docker Marketplace image, Docker and Docker Compose are already installed.
We just need to install `git`:
```bash theme={null}
sudo apt update
sudo apt install -y git
```
To install Onyx, we'll need to clone the repo and set the necessary environment variables.
```bash theme={null}
git clone --depth 1 https://github.com/onyx-dot-app/onyx.git
cd onyx/deployment/docker_compose
cp env.prod.template .env
cp env.nginx.template .env.nginx
```
Fill out the `.env` and `.env.nginx` files.
```bash .env expandable theme={null}
WEB_DOMAIN= # Something like "onyx.app"
# If your email is something like "chris@onyx.app", then this should be "onyx.app"
# This prevents people outside your company from creating an account
VALID_EMAIL_DOMAINS=
# See our auth guides for options here
AUTH_TYPE=
```
```bash .env.nginx theme={null}
DOMAIN= # Something like "onyx.app"
```
Running the `init-letsencrypt.sh` script will get us a SSL certificate from letsencrypt and launch the Onyx stack.
```bash theme={null}
./init-letsencrypt.sh
```
You will hit an error if you fail the letsencrypt workflow more than 5 times.
You will need to wait 72 hours or request a new domain.
If you are skipping the HTTPS setup, start Onyx manually:
```bash theme={null}
docker compose -f docker-compose.dev.yml -p onyx-stack up -d --build --force-recreate
```
Give Onyx a few minutes to start up.
You can monitor the progress with `docker logs onyx-stack-api_server-1 -f`.
You can access Onyx from the instance Public IPv4 or from the domain you set up earlier!
## Next Steps
Set up authentication for your Onyx deployment with OAuth, OIDC, or SAML.
Learn about all available configuration options for your Onyx deployment.