> ## Documentation Index
> Fetch the complete documentation index at: https://docs.onyx.app/llms.txt
> Use this file to discover all available pages before exploring further.
# Website Widget
> Deploy the Onyx chat widget on your website
The Onyx Website Widget allows you to embed AI-powered chat directly on any website.
Features include:
* Lightweight \~100-150kb gzipped bundle
* Fully customizable colors and branding
* Responsive design (desktop popup, mobile fullscreen)
* Real-time streaming responses via SSE
* Session persistence across page reloads
## Deployment Options
### Cloud Deployment (Recommended)
For Onyx Cloud users, the widget is served from Onyx's CDN. Simply add the following to your website:
```html theme={null}
```
### Self-Hosted Deployment
For self-hosted Onyx instances, you'll need to build and host the widget yourself.
Clone the [Onyx repository](https://github.com/onyx-dot-app/onyx) from GitHub.
```bash theme={null}
cd widget/
```
```bash theme={null}
npm install
```
Navigate to your Onyx admin panel and create a new API key specifically for the widget.
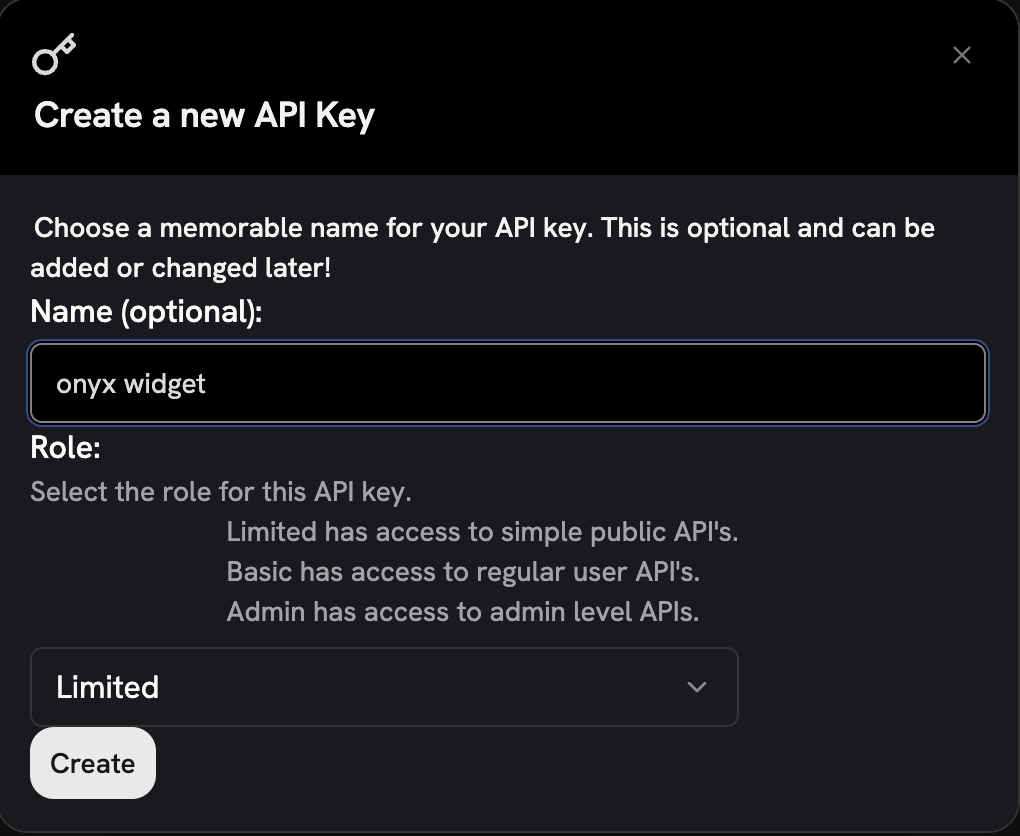 Create a **limited-scope API key** with only chat permissions.
Never use admin or full-access keys since the API key will be visible in client-side code.
For builds with baked-in configuration, create a `.env` file:
```bash theme={null}
cp .env.example .env
```
Edit `.env` and set your backend URL and API key:
```
VITE_WIDGET_BACKEND_URL=https://your-backend.com
VITE_WIDGET_API_KEY=your_api_key
```
For **cloud-style deployment** (config via HTML attributes):
```bash theme={null}
npm run build:cloud
```
For **self-hosted deployment** (config baked into bundle):
```bash theme={null}
npm run build:self-hosted
```
Upload `dist/onyx-widget.js` to your CDN or web server.
### Customer Embed Code
After deployment, provide customers with the embed code:
**Cloud-style (attributes required):**
```html theme={null}
```
**Self-hosted (config baked in):**
```html theme={null}
```
## Configuration Reference
### Required Attributes
| Attribute | Type | Description |
| ------------- | ------ | -------------------------- |
| `backend-url` | string | Your Onyx backend API URL |
| `api-key` | string | API key for authentication |
#### `backend-url`
The URL of your Onyx backend API. This is where the widget sends chat requests.
* **Onyx Cloud**: Use `https://cloud.onyx.app` or your tenant-specific URL
* **Self-hosted**: Use your Onyx instance URL (e.g., `https://onyx.yourcompany.com`)
```html theme={null}
```
#### `api-key`
A valid Onyx API key for authenticating widget requests. **This key is visible in client-side code**,
so always use a limited-scope key.
```html theme={null}
```
For self-hosted builds with baked-in config,
`backend-url` and `api-key` can be set via environment variables during build instead of HTML attributes.
### Optional Attributes
| Attribute | Type | Default | Description |
| ------------------- | ------- | ------------- | ------------------------------------------------ |
| `agent-id` | number | `undefined` | Specific agent/persona to use |
| `agent-name` | string | `"Assistant"` | Display name in header |
| `logo` | string | Onyx logo | URL to custom logo image |
| `primary-color` | string | `#1c1c1c` | Primary brand color (buttons, accents) |
| `background-color` | string | `#e9e9e9` | Widget background color |
| `text-color` | string | `#000000bf` | Text color (75% opacity black) |
| `mode` | string | `"launcher"` | Display mode: `"launcher"` or `"inline"` |
| `include-citations` | boolean | `false` | Show citation badges linking to source documents |
#### `include-citations`
When enabled, assistant messages display clickable citation badges below the response text.
Each badge shows a sequential number and the source document title, linking directly to the original document.
```html theme={null}
```
**Be mindful of document access when enabling citations.** The widget will cite any documents accessible to the
configured agent or API key. If the agent has access to private or internal documents,
citation links may point to resources that end users do not have permission to view.
To avoid exposing private document links, either scope the agent's document access to only public-facing sources,
or disable citations for public-facing widget deployments.
## API Key Security
The widget's API key is exposed in client-side code. Always create a dedicated API key with:
* **Limited permissions** - Only chat access, no admin features
* **Rate limiting** - Prevent abuse from malicious actors
* **Monitoring** - Track usage and detect anomalies
In your Onyx admin panel, create a new API key with minimal permissions.
Configure rate limits appropriate for your expected usage.
Regularly review API key usage for unusual patterns.
## Browser Support
* Chrome/Edge 90+ (Chromium)
* Firefox 90+
* Safari 15+
* Mobile Safari (iOS 15+)
* Mobile Chrome (Android)
**Need help with setup?** Contact your Onyx administrator for API key configuration or deployment assistance.
Create a **limited-scope API key** with only chat permissions.
Never use admin or full-access keys since the API key will be visible in client-side code.
For builds with baked-in configuration, create a `.env` file:
```bash theme={null}
cp .env.example .env
```
Edit `.env` and set your backend URL and API key:
```
VITE_WIDGET_BACKEND_URL=https://your-backend.com
VITE_WIDGET_API_KEY=your_api_key
```
For **cloud-style deployment** (config via HTML attributes):
```bash theme={null}
npm run build:cloud
```
For **self-hosted deployment** (config baked into bundle):
```bash theme={null}
npm run build:self-hosted
```
Upload `dist/onyx-widget.js` to your CDN or web server.
### Customer Embed Code
After deployment, provide customers with the embed code:
**Cloud-style (attributes required):**
```html theme={null}
```
**Self-hosted (config baked in):**
```html theme={null}
```
## Configuration Reference
### Required Attributes
| Attribute | Type | Description |
| ------------- | ------ | -------------------------- |
| `backend-url` | string | Your Onyx backend API URL |
| `api-key` | string | API key for authentication |
#### `backend-url`
The URL of your Onyx backend API. This is where the widget sends chat requests.
* **Onyx Cloud**: Use `https://cloud.onyx.app` or your tenant-specific URL
* **Self-hosted**: Use your Onyx instance URL (e.g., `https://onyx.yourcompany.com`)
```html theme={null}
```
#### `api-key`
A valid Onyx API key for authenticating widget requests. **This key is visible in client-side code**,
so always use a limited-scope key.
```html theme={null}
```
For self-hosted builds with baked-in config,
`backend-url` and `api-key` can be set via environment variables during build instead of HTML attributes.
### Optional Attributes
| Attribute | Type | Default | Description |
| ------------------- | ------- | ------------- | ------------------------------------------------ |
| `agent-id` | number | `undefined` | Specific agent/persona to use |
| `agent-name` | string | `"Assistant"` | Display name in header |
| `logo` | string | Onyx logo | URL to custom logo image |
| `primary-color` | string | `#1c1c1c` | Primary brand color (buttons, accents) |
| `background-color` | string | `#e9e9e9` | Widget background color |
| `text-color` | string | `#000000bf` | Text color (75% opacity black) |
| `mode` | string | `"launcher"` | Display mode: `"launcher"` or `"inline"` |
| `include-citations` | boolean | `false` | Show citation badges linking to source documents |
#### `include-citations`
When enabled, assistant messages display clickable citation badges below the response text.
Each badge shows a sequential number and the source document title, linking directly to the original document.
```html theme={null}
```
**Be mindful of document access when enabling citations.** The widget will cite any documents accessible to the
configured agent or API key. If the agent has access to private or internal documents,
citation links may point to resources that end users do not have permission to view.
To avoid exposing private document links, either scope the agent's document access to only public-facing sources,
or disable citations for public-facing widget deployments.
## API Key Security
The widget's API key is exposed in client-side code. Always create a dedicated API key with:
* **Limited permissions** - Only chat access, no admin features
* **Rate limiting** - Prevent abuse from malicious actors
* **Monitoring** - Track usage and detect anomalies
In your Onyx admin panel, create a new API key with minimal permissions.
Configure rate limits appropriate for your expected usage.
Regularly review API key usage for unusual patterns.
## Browser Support
* Chrome/Edge 90+ (Chromium)
* Firefox 90+
* Safari 15+
* Mobile Safari (iOS 15+)
* Mobile Chrome (Android)
**Need help with setup?** Contact your Onyx administrator for API key configuration or deployment assistance.